A tute! Turkish cast on
G'day all!
Updated 22 March 2013.
Last year I was asked to show my LYS in Fort Collins how I cast on socks. They thought it was fab. Heh. Made me feel good!
So I wrote up a tute on how to do it and showed some folks. I thought it would be good to share with you too!
Let me know if there are any probs with it. Scuse the odd fuzzy photo!
Toe up socks - the cast on
This cast on is great for anything knitted from the toe up, top of head down or fingertip down. You just vary the number of stitches you start off with. You won't have twisted stitches (if you are a western knitter - continental and combined types might have to play around a little! And lefties, ah lefties - I am a lefty but I knit right handed - see if the mirror image works for you!).
You will need loooong circular needles - at least 47"/120cm. Metre long circs are a little harder to wrangle especially if you end up with two socks on them and 1.5m circs can be very loopy indeed. I knit socks using the magic loop method. If you feel safer on two circs or on DPNs, start off with circs for the first two or three rounds then transfer to your favourite method. You need circs to start off with cos the cables give you a little extra room as they have a smaller diameter than the needles.
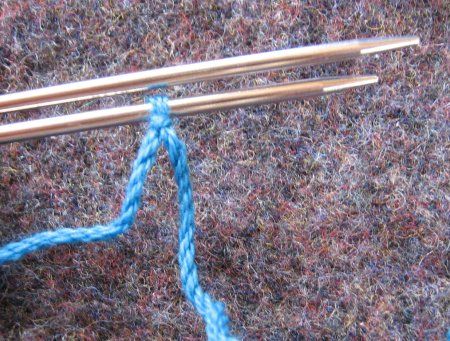
1. We start off with a slip knot
2. Put the slip knot onto one of the tips of the circular needles:
3. Put the needles side by side and wrap the working yarn around the needles anti-clockwise (if you look at the needles from the pointy end, the yarn is wrapped counter-clockwise or widdershins). Note - this instruction only works for western/English throwers, not pickers.
4. Wind on as many stitches as you need divided by two. I tend to use between 8-10 windings, which gives 16-20 stitches all up. The tip of the toe tends to be around 2-3cm (about an inch) wide. If you want a wider toe tip, wind on more stitches.
5. Pull the bottom needle through the wound on stitches. Pinching the stitches to stop them falling off is very helpful!
6. Bring the bottom needle around in a loop so that you can start to knit.
7. Bring the yarn around the needles and start to knit the loops/stitches as you usually would.
As you knit it might look messy but never fear, it usually looks quite tidy once you have knitted all the first round. If necessary you can pull the stitches tighter after you have cast on the toe and knitted a few rounds.
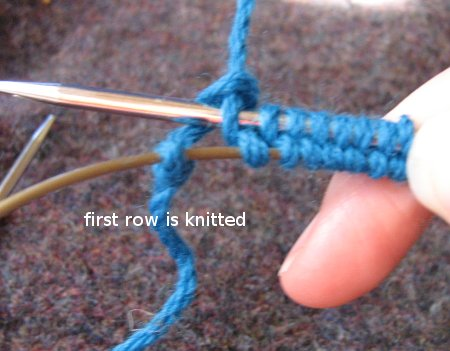
8. The first row is done.
Now you need to knit the second row to complete the round.
9. Pull the needle through that you just finished knitting onto so that the new stitches sit on the cable.
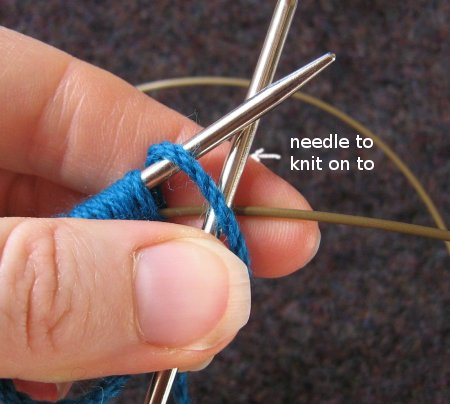
10. Turn the work over so the bottom needle is now the top needle.
11. Pull the new top needle back so that the stitch loops are ready to knit. The slip knot is the first stitch on the needle. Pull the bottom needle through so that you can loop it around ready to knit.
12. Drop the slip knot off and put it behind the working yarn so that it is caught.
13. Bring the second needle around and up to start knitting the loops. Knit away!
Hooray! You have finished the first round! Plus you've just knitted using Magic Loop!
14. Use your favourite increase to start making the toe of the sock. At the start of the round, knit one, increase one, knit to the second last stitch, increase between it and the last stitch, knit one on the new needle, increase one, knit to the second last stitch and increase between it and the last stitch.
I tend to use kf&b - knit front and back for my socks. It leaves a little bar for the increased stitch but it is easier to do if you want to increase on every row for a very broad toe. Lifted increases, make ones, etc are hard to do for every row, and can be tricky on the first couple of rounds of sock toe.
Edited to add (March 2013) I now usually use a lifted increase after doing 1.5 rounds, when there are three "rows" of knitting on the needles.
At this point if you feel more comfortable, you can use DPNs, or two circs or continue using Magic Loop. Increase every second round until you have the number of stitches you require (which is the same as for a top down sock). I usually use 64 stitches for a woman's foot, 72 for a man's.
Notes on toe increases:
If you wish to have a broad, flat toe on the sock, either use more windings at the start or increase in every row for the first six or so rounds. If you increase in every row, I recommend the yarn over, knit into the back loop type increase as the others get very tight and confusing to knit.
If you want to have a star type toe, wind on about three or four loops and then after the first round start increasing increase into every second stitch, then every third stitch, fourth stitch, etc every two-three rounds until you reach the number of stitches you want. This also works for fingertips and tops of hats.
You can increase at any place along the stitches - two stitches in, four stitches in, your choice! Turkish socks (traditionally knitted toe up) have a central band of stitches with increases moving away from them.
Play around with the increases. Maybe you want a very long toe - increase every third or fourth round instead after the initial six or so increases.
Enjoy!
Updated 22 March 2013.
Last year I was asked to show my LYS in Fort Collins how I cast on socks. They thought it was fab. Heh. Made me feel good!
So I wrote up a tute on how to do it and showed some folks. I thought it would be good to share with you too!
Let me know if there are any probs with it. Scuse the odd fuzzy photo!
Toe up socks - the cast on
This cast on is great for anything knitted from the toe up, top of head down or fingertip down. You just vary the number of stitches you start off with. You won't have twisted stitches (if you are a western knitter - continental and combined types might have to play around a little! And lefties, ah lefties - I am a lefty but I knit right handed - see if the mirror image works for you!).
You will need loooong circular needles - at least 47"/120cm. Metre long circs are a little harder to wrangle especially if you end up with two socks on them and 1.5m circs can be very loopy indeed. I knit socks using the magic loop method. If you feel safer on two circs or on DPNs, start off with circs for the first two or three rounds then transfer to your favourite method. You need circs to start off with cos the cables give you a little extra room as they have a smaller diameter than the needles.
1. We start off with a slip knot
2. Put the slip knot onto one of the tips of the circular needles:
3. Put the needles side by side and wrap the working yarn around the needles anti-clockwise (if you look at the needles from the pointy end, the yarn is wrapped counter-clockwise or widdershins). Note - this instruction only works for western/English throwers, not pickers.
4. Wind on as many stitches as you need divided by two. I tend to use between 8-10 windings, which gives 16-20 stitches all up. The tip of the toe tends to be around 2-3cm (about an inch) wide. If you want a wider toe tip, wind on more stitches.
5. Pull the bottom needle through the wound on stitches. Pinching the stitches to stop them falling off is very helpful!
6. Bring the bottom needle around in a loop so that you can start to knit.
7. Bring the yarn around the needles and start to knit the loops/stitches as you usually would.
As you knit it might look messy but never fear, it usually looks quite tidy once you have knitted all the first round. If necessary you can pull the stitches tighter after you have cast on the toe and knitted a few rounds.
8. The first row is done.
Now you need to knit the second row to complete the round.
9. Pull the needle through that you just finished knitting onto so that the new stitches sit on the cable.
10. Turn the work over so the bottom needle is now the top needle.
11. Pull the new top needle back so that the stitch loops are ready to knit. The slip knot is the first stitch on the needle. Pull the bottom needle through so that you can loop it around ready to knit.
 |
| (Sorry, blurry!) |
12. Drop the slip knot off and put it behind the working yarn so that it is caught.
13. Bring the second needle around and up to start knitting the loops. Knit away!
Hooray! You have finished the first round! Plus you've just knitted using Magic Loop!
14. Use your favourite increase to start making the toe of the sock. At the start of the round, knit one, increase one, knit to the second last stitch, increase between it and the last stitch, knit one on the new needle, increase one, knit to the second last stitch and increase between it and the last stitch.
I tend to use kf&b - knit front and back for my socks. It leaves a little bar for the increased stitch but it is easier to do if you want to increase on every row for a very broad toe. Lifted increases, make ones, etc are hard to do for every row, and can be tricky on the first couple of rounds of sock toe.
Edited to add (March 2013) I now usually use a lifted increase after doing 1.5 rounds, when there are three "rows" of knitting on the needles.
At this point if you feel more comfortable, you can use DPNs, or two circs or continue using Magic Loop. Increase every second round until you have the number of stitches you require (which is the same as for a top down sock). I usually use 64 stitches for a woman's foot, 72 for a man's.
Notes on toe increases:
If you wish to have a broad, flat toe on the sock, either use more windings at the start or increase in every row for the first six or so rounds. If you increase in every row, I recommend the yarn over, knit into the back loop type increase as the others get very tight and confusing to knit.
If you want to have a star type toe, wind on about three or four loops and then after the first round start increasing increase into every second stitch, then every third stitch, fourth stitch, etc every two-three rounds until you reach the number of stitches you want. This also works for fingertips and tops of hats.
You can increase at any place along the stitches - two stitches in, four stitches in, your choice! Turkish socks (traditionally knitted toe up) have a central band of stitches with increases moving away from them.
Play around with the increases. Maybe you want a very long toe - increase every third or fourth round instead after the initial six or so increases.
Enjoy!


Thanks for putting the tute together! I love the Turkish cast on :)
ReplyDeleteYou made this very clear. Thanks for putting it together!
ReplyDeleteI'm keeping this one bookmarked :)
ReplyDeleteGreat tute, I love how this gives a lovely seamless toe with no grafting involved :-D Have bookmarked for future use!
ReplyDeleteThis is the cast on you showed me last year, and I use it every time I knit (um, er, make that attempt to knit) toe-up socks! (they have a nasty habit of 'stalling' at the heels).
ReplyDelete:D